
04. 8 types of sound synthesis
In the previous episode we've seen a couple of things we could do by stacking up 2 or more oscillators.
Even though layering is a very important concept in sound design, there's so much more you can do with 2 oscillators to create your own sound.
So today we're going to see that and talk about sound synthesis. There're a lot of types of sound synthesis so let's start right away with the first one:
ADDITIVE SYNTHESIS
Additive synthesis is creating a sound by adding harmonics in the sound. That can be achieved by stacking oscillators on top of each other, like we did last time.
But most of the time we use sine wave to do that, so we can add harmonics one by one.
Each harmonic you add will change the waveform, because the waveform is dependent of the harmonic content and vice versa. So changing one will change the other.

You can do additive synthesis in Ableton's operator. Here in this area, every vertical bar represent a harmonic of the harmonic series. And their height represent their volume.

If you don't know what the harmonic series is, it might be a good time to watch my old episode about harmonics and overtones (the second chapter of this series). Everything is explained there.
So if you have only the first harmonic, the fundamental, you'd have a sine wave. Then if you add an harmonic every two, you'd have more of a square waveform, and if you add every harmonic you begin to have more of a sawtooth.

What's interesting with Additive synthesis is that you can control the volume of each harmonic independently, so you could shape you sound with more flexibility.
You can also do Additive synthesis in Serum by clicking on a pencil icon in the oscillator section. Then, in this window you'll have the same display with all these bars. With a visual representation of the waveform you are creating.

SUBTRACTIVE SYNTHESIS
Subtractive synthesis is starting with a sound that is rich in harmonics, and then removing some of them using filters.
There are a lot of different filters to choose from and we'll see what they can do in a dedicated video. But for now you can remember that Subtractive synthesis is gradually removing harmonics using those filters.
To give you an example regardless, a low pass filter will cut the high frequencies if a sound. It can make it sound less harsh or more muffled.
And the high pass filter will cut the low frequencies of a sound, which can be useful to leave some space for the other layers in you sound.
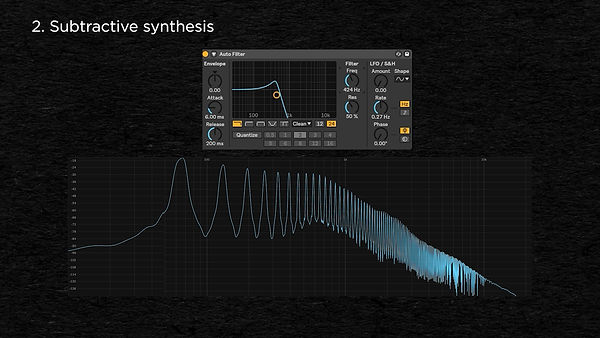
So subtractive synthesis works particularly well when you start with a sound with a lot of harmonics
To give you an example of subtractive synthesis in its purest form, you can start with white noise, which contains all frequencies, and then use filters or an eq to let through only the frequencies you want.
Here, my white noise goes through a comb filter which only let the frequencies of a harmonic series go through.

WAVETABLE SYNTHESIS
In a wavetable synth, like serum or Ableton's wavetables, the oscillator is called a table and it actually contains several waveforms.
You'd then have a knob to cycle through them and morph your sound.

This can be a good way to add motion to your sound to make it more organic.
Varying the waveform in conjunction with the opening of a filter or the drive of a distortion can really make your sound come alive.
This is interesting because you could have any waveform morphing to any waveform, so the possibilities are endless.
Some these synth like Serum even allows you to draw your own waveforms or to import your own audio sample, and it will extract the waveforms from it.
For example, if I import a sound in Serum, it would give me all these waveforms. That I can then have in my oscillator.

Among these waveforms, you can do a selection. You can erase some of them, you can keep just some of them, and if you have just a few different waveforms loaded here, you can interpolate waveforms between them, so you can smooth smoothly between them. To do that it's in the morph section. Let's try morph spectral for example.
See, the first one is in index 1 and the second one is in index 256, which means that there are actually 255 different waveforms to transition from one to the other.

AM SYNTHESIS
AM stands for "amplitude modulation".
And the amplitude of the signal is basically the volume of the sound.
Amplitude modulation means that this volume is modulated: the volume changes following another signal.
So for AM synthesis you'll actually need 2 oscillators. One is the sound source, that provides a sound you can hear, it is called the carrier, and the other is the one controlling the volume knob of the first one, that is called the modulator.
So for example we have an oscillator with a sine waveform, that's our base sound, the carrier.
Then we have an LFO, which stand for "low frequency oscillator", that will provide also a sine wave, but very slow.
If we make this LFO control the volume knob of the first oscillator, it becomes the modulator.

At this rate, you can hear the sound go louder then quieter, along with the LFO's oscillations.
For now, it's no big deal. But if the LFO then goes faster and and faster, it starts distorting the sound. When the modulator oscillates fast enough it begins to distort the shape of the waveform itself and it begins to add harmonic content to the original signal.

It will add several harmonics for each harmonic already present in the original sound. So if I add other sine in the carrier, so we begin with 2 harmonics, you can see a series of harmonics being added for both.

Changing the amplitude, or volume, of the modulator changes the overall volume of the added harmonics.
From there you can experiment with different waveforms for the carrier and for the modulator.
And it's worth noting that you can replace this LFO by a simple oscillator as well, with any wave form, as an oscillator and a LFO are essentially the same thing, only the LFO oscillates way slower.
One last thing about AM synthesis. Have you heard about "ring modulators"? These are devices that can make a sound more metallic, that sound a bit like a bell.
The name ring modulation comes from the fact that early analog devices that made ring modulation used 4 diodes, linked together in the shape of a ring.

Well, Ring modulation is essentially the same thing than amplitude modulation. The only difference is that with ring modulation, only the added harmonics remains, and the original frequency of the carrier disappears.
Whereas with amplitude modulation both the added harmonics and the original frequency of the carrier remain. Apart from that, they work in the same way.

FM SYNTHESIS
FM stands for frequency modulation, and the frequency is basically the pitch of your oscillator. So FM synthesis is similar to AM synthesis is the way they both involve a carrier and a modulator.
But here with FM, the modulator will control the pitch of the carrier.
In the same example than before, I will link the LFO to the frequency of the oscillator.

You can hear the pitch going up and down along with the LFO.
And in the same way, when the oscillation rate of the LFO goes up, it starts distorting the sound of the carrier. But it adds a lot more harmonics, creating potentially a much richer sound.

One of the differences with AM synthesis is that here with FM, when you move the amplitude, or the volume, of the modulator, it also affects the harmonic content that is added to the sound. Not only their overall volume, but also the distribution of the harmonics.
Now, this is the core principle of FM synthesis. It can go a lot deeper. For example we can add a third oscillator before this modulator one, so it's frequency also goes up and down.

So if I crank up the frequency of this oscillator we can get yet another sound.
From there you can add other oscillators and connect them in many different ways.
I'm showing you this because FM synthesis was popularised by the DX7. It was a synth that used 6 oscillators, that you could connect in many different ways.
This architecture was so popular and versatile that it's been copied in many synth, like the volca FM or the software dexed, which you can download for free.

You can do many different sounds with FM synthesis, it's really a rabbit hole that goes a very long way.
So here are a couple of examples from dexed library.
WAVE SHAPING SYNTHESIS
I'll also add wave shaping synthesis which generally starts with a simple waveform such as a sine wave, a triangular wave or a sawtooth wave, that is then distorted by a waveshaper.
The waveshaper will basically change the shape of the incoming waveform, based on a function.

And there are a lot of things you can do with it. It is a type of distortion so we'll see that more in details in the episode about distortion and saturation.
But just to name drop what you can do with it, you can do some saturation, asymmetric saturation, wave folding or phase inversion for example.
HARD SYNC
Hard sync is not really considered as a type of synthesis, I don't think anybody talks about hard sync synthesis, but it creates a very particular sound, so I wanted to include it here.
It is close to AM and FM synthesis in the sense that it requires 2 oscillators, one controlling a parameter of the other.
What happens is that every time one oscillator finishes a wave cycle, it resets the cycle of the other oscillator. That creates a break in the waveform, and it creates a distinctive distortion.

But having one oscillator reseting the phase of the other means several things:
1 - the 2 oscillators will have the same Base frequency, because the master oscillator will force the slave oscillator 's period to reset at the master's frequency.
So if you change the master oscillator's frequency it will change the pitch, and if you change the slave oscillator's frequency it will change the timbre.
2 - you will hear the effect better if the two oscillators are detuned or play 2 different notes. Because if they are perfectly in tune and play the same note, then their phases would be perfectly in sync, and it won't cause any break in the waveform, it would be seamless
3 - the waveform of the master oscillator doesn't really matter as it is only it's frequency that will determine when to reset the period of the slave.
Usually the frequency of the master oscillator is the frequencies of the notes you play on the keyboard, and the frequency of the slave oscillator is either tuned from these notes or it can be set to a constant frequency.
This really depends on how your synth is built and the options you have on it.
Last thing to keep in mind with Hard Sync is if the slave is tuned to a lower frequency than the master oscillator, it will be forced to repeat before it completes an entire cycle. And if it is tuned to a higher frequency, the slave's waveform will be retriggered after one or a few complete cycles. And this can give an impression that two notes play at the same time. So if you sweep the tuning of the salve oscillator you will actually hear kind of a harmonic series.

GRANULAR SYNTESIS
Granular synthesis doesn't use an oscillator as a sound source, instead it uses an audio sample. Well, it could still be a sample of a sound made with an oscillator, but still, it uses an audio sample, and slices it into a lot tiny audio bits, generally between 1ms and 50ms each. These tiny snippet of sound are called grains.

These grains can be layered on top of each other, played at different speed, different lengths, volumes, etc...
This kind of synthesis, is handy to creates a mellow textures often referred as "clouds", but it can do much more.
There is a free max4live plugin that allows you to do Granular synthesis in Ableton Live, it's called granulator II.
Here you can place your sample. Let's take this one for the example.

And there you can define the size of the grains, where they are reading from, move the playing head while you play, change the pitch of the grains, randomise these parameters and more. Check out this plugin, it's free and fun to play with.
Granular synthesis is also uses by some built-in functions of Ableton, like the time stretch. The time stretch works in a similar fashion in other DAWs, but I I don't know them as much as Ableton, so I'll use this one for the example.
Time stretch allows you to make a sound longer, without changing its pitch. To do so, Ableton will cut you sound in several grains, then repeat some of them to make the sound longer. You can then change the size of these grains in the warp mode section of your sample.
By default it's on "beats", in this mode, Ableton makes a new grain on every transient it finds.

It's good for small stretches or if you want to make your sound shorter, but for bigger stretches, you might want to try other modes.
First, still in beats mode, you can set the grains size to a subdivision of you tempo. It's nice to make a rhythmic texture in sync with your tempo.

Or you can make the grains shorter by clicking on this arrow, to make sure each grain is read only once, and by reducing this value.
It is nice to make a drum loop sound snappier for example.

You can also use the texture mode that allows you to set the size of the grain to tinier bits.
Or the complex and complex pro functions which are supposed to be of best fidelity to the original sounds, but with more extreme stretches it introduces some metallic tones that can be very nice.
Also, very last tip for this video: to create your own waveform, you can load a sample in a sampler, and select a very tiny part of it and play it in loop. Because this part is played in loop very quickly, it will just serve as a new waveform.

The cool thing with this technic is that you can start reading the sample from a point outside of the loop, so you could keep also particular transient.
But the sound you're making this way may not be in tune, so you should tune it afterward.
I used to do that a lot to design bass sounds, starting with kick drum samples.
And these are the 8 audio synthesis types that I wanted to share with you today: Additive, Substractive, AM, FM, wavetable, waveshaper, hard sync and Granular synthesis.
That was a quick overview of how they work, but we'll see them again in this series.
Most of these types of audio synthesis add a lot of harmonic content, they do very rich sounds. It's often a good idea to combine them with filters to tame them a little.
So next time we'll see the subtractive synthesis more in detail and we'll see the different EQ and filter types you can use to shape those sounds.
